9 Installation
Below you can find easy step-by-step OS dependent guides to the installation of IQdesktop and the required components. This guide is aimed for the installation of IQdesktop on a single-user environment - and to get a first insight into the general installation process.
Note that installation of docker requires administrator rights on the host computer.
9.1 Windows
9.1.1 Step1: Docker
Install docker-desktop that you can obtain from here: https://www.docker.com/products/docker-desktop
Add your username to the
dockergroup- Press the Windows key
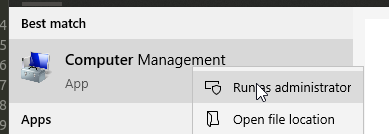
- Type “Computer Management”
- Right click “Computer Management” and select “Run as administrator”
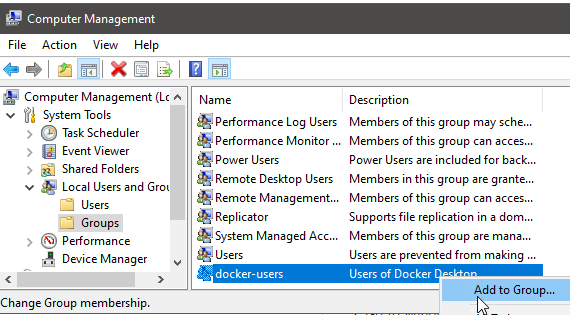
- Navigate to “System Tools” -> “Local Users and Groups” -> “Groups” -> “docker-users”
- Double click “docker-users” group and add your account/username as member


Start docker

Update docker settings
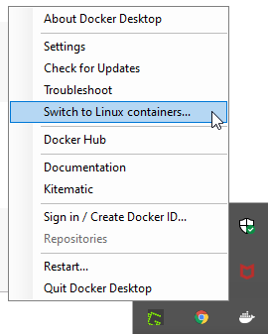
- Find the docker icon in the Windows task bar and right click on it, select “Switch to Linux containers…” as shown in the figure to the right. If this option is not shown then do not change it
- Select “Settings” => “General” and uncheck “Use the WSL 2 based engine”
- Select “Settings” => “Resources” => “Advanced” and change the settings as desired. Typically I allow my docker installation to have access to at least half my computers memory and more than half the cores. After all I want to use it for computation.
- Select “Settings” => “Resources” => “Advanced” and set
Swapto 2 GB (higher not needed - lower not a good idea) - Select “Settings” => “Resources” => “File Sharing” in the Docker options and set a tick in the box for the C drive
Additional information: https://docs.docker.com/docker-for-windows/install/.
9.1.2 Step 2: IQdesktop
The public version of IQdesktop is hosted on Docker Hub. No login to Docker Hub is required. You can download it to your system as follows:
- On your systems command line type:
docker pull intiquan/iqdesktop:latest - Wait until download is completed
The image is relatively large (~8GB). The download might take a while, depending on your internet connection. Once downloaded, the image will remain on your system and does not need to be downloaded again. If you want to install updates to IQdesktop, only incremental changes are downloaded.
Read more about the public version, versioned versions, and updates of versions here: IQdesktop Versions.
9.1.3 Step 3
- It’s done!
- Go to the Configuration Chapter to see how to configure IQdesktop for your needs
The next subsection provides information on how to update IQdesktop to a newer version and how to install versioned IQdesktop images that were received from IntiQuan (not obtained from Docker Hub).
9.2 MacOS
9.2.1 Step1: Docker
- Install docker-desktop that you can obtain from here: https://www.docker.com/products/docker-desktop
- Add your user to the
dockergroup using the commandsudo usermod -aG docker "username" - Click the Docker menu (whale menu) to see preferences and other options
Additional information: https://docs.docker.com/docker-for-mac/install/.
9.2.2 Step 2: IQdesktop
The public version of IQdesktop is hosted on Docker Hub. No login to Docker Hub is required. You can download it to your system as follows:
- On your systems command line type:
docker pull intiquan/iqdesktop:latest - Wait until download is completed
The image is relatively large (~8GB). The download might take a while, depending on your internet connection. Once downloaded, the image will remain on your system and does not need to be downloaded again. If you want to install updates to IQdesktop, only incremental changes are downloaded.
Read more about the public version, versioned versions, and updates of versions here: IQdesktop Versions.
9.2.3 Step 3
- It’s done!
- Go to the Configuration Chapter to see how to configure IQdesktop for your needs
The next subsection provides information on how to update IQdesktop to a newer version and how to install versioned IQdesktop images that were received from IntiQuan (not obtained from Docker Hub).
9.3 Linux
Note that the installation process is independent of the host planned to be a single or multi-user system.
9.3.1 Step1: Docker
- Install docker as described here: https://docs.docker.com/install/
- Install docker-compose as described here: https://docs.docker.com/compose/install/
- Add your user to the
dockergroup using the commandsudo usermod -aG docker "username"
9.3.2 Step 2: IQdesktop
The public version of IQdesktop is hosted on Docker Hub. No login to Docker Hub is required. You can download it to your system as follows:
- On your systems command line type:
docker pull intiquan/iqdesktop:latest - Wait until download is completed
The image is relatively large (~8GB). The download might take a while, depending on your internet connection. Once downloaded, the image will remain on your system and does not need to be downloaded again. If you want to install updates to IQdesktop, only incremental changes are downloaded.
Read more about the public version, versioned versions, and updates of versions here: IQdesktop Versions.
9.3.3 Step 3
- It’s done!
- Go to the Configuration Chapter to see how to configure IQdesktop for your needs
The next subsection provides information on how to update IQdesktop to a newer version and how to install versioned IQdesktop images that were received from IntiQuan (not obtained from Docker Hub).
9.4 In the Cloud
IQdesktop deployment in the cloud is straight forward. Nevertheless, it might be a good idea to have a “cloud strategy” not only for your computational system but also for data storage, security, etc.
There are several cloud systems - and IQdesktop will run on all which are able to provide access to an instance with a Linux based operating system on which Docker can run (see here for Docker system requirements).
A simple example on how to get IQdesktop running on AWS within minutes is shown in Appendix C.
Of course, you can also use more sophisticated approaches, such as
- AWS ECR, Azure Container Registry, Google Cloud Container Registry
- EPAM Cloud Pipeline
- Your own custom written scripts.
- Etc.
